A concrete walk-through of turning one beginner programming concept — adding an element to an array — into a 34-second animated explainer with Codex + Remotion. The point of the case study is the workflow: start from the learning goal and the misconception, storyboard before any code, build the visual directly from React components (no image generation), and verify with still frames before the full render. It pairs with the Manim + Remotion overview, which covers when to use each engine.
| *Source: first-party LearnAI case study (Codex + Remotion), 2026-06-03 | Remotion* |
The Teaching Goal — and the Misconception It Targets
Topic: adding elements to an array, for beginner programming students. The learning goal is to separate three things students tend to conflate:
- appending a value to the end of an array,
- inserting a value into the middle, and
- shifting existing elements to make space.
The misconception the video is built to break: “adding to an array” is not always one operation. Appending is usually cheap (amortized, for a dynamic-array-backed list); inserting at an index moves every later element. Anchoring the whole video on a single misconception is what keeps a 34-second clip focused.
Storyboard First, Not Images
The build started from a six-scene storyboard, not from generated artwork:
Scene 1 Title
Scene 2 What is an array? boxes with values + index labels
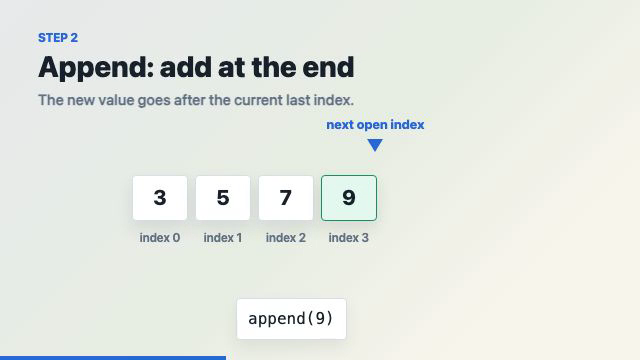
Scene 3 Append [3, 5, 7] -> [3, 5, 7, 9]
Scene 4 Insert insert 4 at index 1
Scene 5 Shift move 5, 7, 9 one slot right
Scene 6 Quick check what if we insert at index 0?
The insight: for a structural concept, the core teaching object is boxes, indexes, arrows, and motion — so generated images were unnecessary and would only have added noise. The rendered video bears this out: a title card (“Appending adds after the last item. Inserting into the middle first makes space.”), color-coded cells with index 0..3 labels, an append(9) pointer, and a side-by-side takeaway — [3,5,7] → [3,5,7,9] (append) vs [3,5,7,9] → [3,4,5,7,9] (insert). The final cut realizes scenes 1–5 and closes on that takeaway, with the “insert at index 0?” prompt as the parting check.
The Build (Remotion Specifics)
One composition holds the whole animation:
Composition id: ArrayAdditionLesson
Resolution:     1280x720   FPS: 30   Duration: 1020 frames (34 s)
Files touched: src/Root.tsx (registers the composition’s id, size, fps, duration), src/Composition.tsx (the entire animation), src/index.css (scopes box-sizing: border-box to the lesson).
The project is a local Remotion prototype (array-addition); what makes it reproducible is the patterns below, not the specific repo. Everything is frame-driven, because Remotion renders frame by frame — CSS animations are avoided. The core of any frame-timed Remotion animation:
const frame = useCurrentFrame();
const {fps} = useVideoConfig();
The reusable timing helper — convert seconds to frames, then drive every transition with a clamped, eased interpolate:
const s = (seconds: number) => Math.round(seconds * fps);

const progress = interpolate(frame, [start, start + duration], [0, 1], {
  easing: Easing.bezier(0.16, 1, 0.3, 1),
  extrapolateLeft: "clamp",
  extrapolateRight: "clamp",
});
Visual design is pure React + inline styles for precise motion: fixed-size cells, index labels beneath each cell, and a consistent color key — green for the appended value, blue for the inserted value, amber for shifted values — plus pointer labels (“next open index”, “insert at index 1”, “front”).
Verification — Stills Before the Full Render
The render loop checked cheap still frames at known timestamps before committing to a full encode:
npm run lint                                                            # static check
./node_modules/.bin/remotion still ArrayAdditionLesson out/stills/title-030.png         --frame=30  --scale=0.5
./node_modules/.bin/remotion still ArrayAdditionLesson out/stills/append-330.png        --frame=330 --scale=0.5
./node_modules/.bin/remotion still ArrayAdditionLesson out/stills/insert-630-v2.png      --frame=630 --scale=0.5
./node_modules/.bin/remotion still ArrayAdditionLesson out/stills/insert-settled-690.png --frame=690 --scale=0.5
./node_modules/.bin/remotion still ArrayAdditionLesson out/stills/check-930.png          --frame=930 --scale=0.5
./node_modules/.bin/remotion render ArrayAdditionLesson out/array-addition-lesson-preview.mp4 --scale=0.5
npm run dev -- --port=3000                                              # Studio at http://localhost:3000
Rendering a still at frame N is near-instant, so these five stills (title, append, insert, insert-settled, check) catch layout and timing bugs long before the minutes-long full render.
The Workflow That Worked
concept → learning goal → misconception → running example → storyboard
        → Remotion components → still-frame checks → full preview render
Starting from images would have inverted this. For programming education, most concepts need structure and motion more than illustration — so the code-first path is both faster and more precise.
A Reusable Template
For the next teaching video, fill this in before writing any code:
Concept:
Audience:
Learning goal:
Common misconception:
Running example:
Scene list:
What should move:
What should be highlighted:
What needs generated images:
Verification frames:
Final video path:
Remotion can render the core visual directly — no image generation — for arrays, stacks, queues, loops, recursion trees, state machines, charts, proof steps, and code walkthroughs. Reach for generated images only when a concept needs a metaphor, character, realistic object, or background.
Setup Gotcha: the create-video Invocation
The plain npx form from the docs failed because npm parsed the flags itself:
# did NOT work (npm swallowed --yes --blank --no-tailwind)
npx create-video@latest --yes --blank --no-tailwind array-addition
The working, non-interactive form routes the flags through npm exec --package:
mkdir -p ~/Desktop/remotion && cd ~/Desktop/remotion
npm exec --yes --package=create-video@latest -- create-video --yes --blank --no-tailwind array-addition
cd array-addition && npm i
This is the cleanest way to scaffold a blank Remotion project without the interactive template picker — worth keeping next to the overview entry’s setup notes.
Next Improvements
- Add a narration script and captions synced to the scenes (Remotion’s caption tooling).
- Add a small final quiz card.
- Extract a reusable
ArrayCellcomponent library for future data-structure lessons. - Build a companion case study for deleting from an array, so students can compare insert/delete symmetry.
Built with Codex + Remotion (4.x). The clip above is the --scale=0.5 preview render (1280×720 source, 34 s).